Running Flyte on GKE

Overview
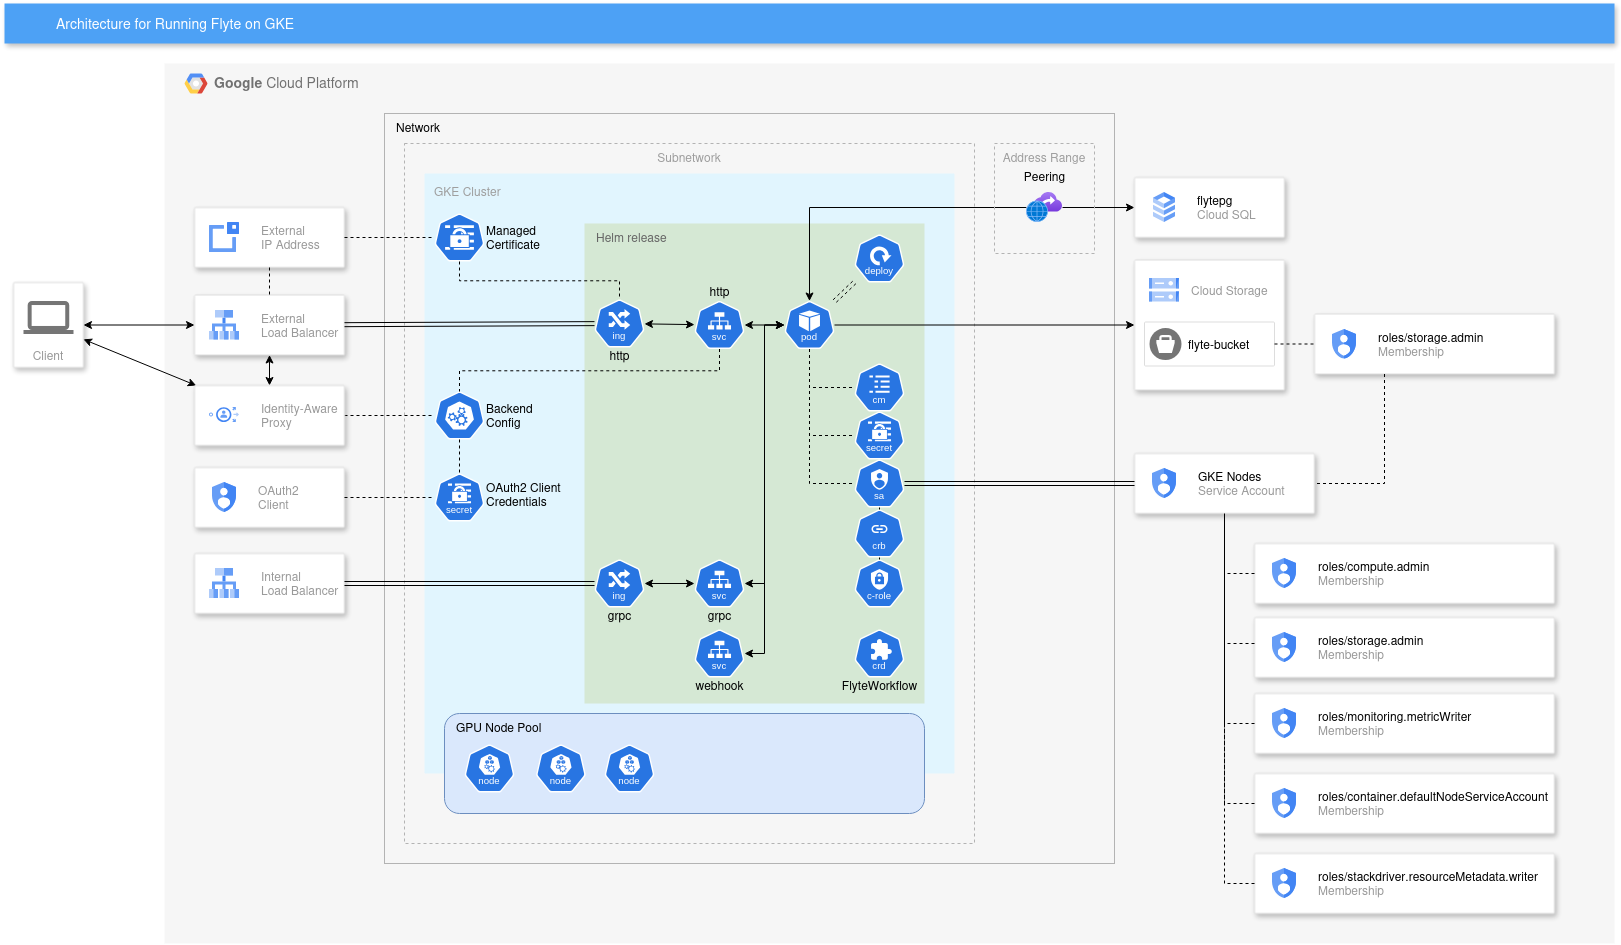
This guide illustrates the deployment of Flyte on Google Kubernetes Engine (GKE) using Helm, utilizing Google Cloud Storage for scalable data storage and Cloud SQL PostgreSQL for a reliable metadata store. By the end of this tutorial, you will have a fully functional Flyte instance on GKE, offering businesses seamless integration with the GCP ecosystem, improved resource efficiency, and cost-effectiveness. ML platform engineers will benefit from the simplified deployment and management provided by GKE, along with the enhanced security achieved by enabling authentication using Google OAuth.
Before you begin
-
Ensure you have a GCP project with billing enabled and have enabled the GKE API.
-
Follow this link to learn how to enable billing for your project.
-
GKE API can be enabled by running:
gcloud services enable container.googleapis.com
-
-
Ensure you have the following tools installed on your workstation:
Architecture overview
Clone the repository
Clone the repository with our guides and cd to the flyte directory by running these commands:
git clone https://github.com/ai-on-gke/tutorials-and-examples.git
cd tutorials-and-examples/flyte
Setting up your GKE cluster with Terraform
Let’s start with setting up the infrastructure using Terraform. The Terraform configuration will create an Autopilot or Standard GKE cluster with GPU node pools (only for Standard clusters).
-
Create variables file for Terraform.
Copy the
example_environment.tfvarsfile to a new file, e.g.,your_environment.tfvars, and fillproject_idandcluster_namewith your values. You can also adjust any other parameters as you need.project_id = "google-project-id" cluster_name = "flyte-test" autopilot_cluster = true # Set to false for Standard cluster -
Initialize and apply the Terraform configuration.
terraform init
terraform apply -var-file=your_environment.tfvars
After the Terraform apply finishes, you should see output similar to the following:
Apply complete! [...]

Outputs:

cloudsql_ip = "10.59.0.3"
cloudsql_password = <sensitive>
cloudsql_user = "flytepg"
gke_cluster_location = "us-central1"
gke_cluster_name = "flyte-test"
bucket_name = "flyte-bucket-name"
project_id = "google-project-id"
service_account = "tf-gke-flyte-test-k3af@flyte-project.iam.gserviceaccount.com"
Also, the
flyte.yamlfile should be generated with the necessary configuration for the Flyte deployment using Helm. The file is generated based on theflyte.yaml.tpltemplate and the outputs from the Terraform. You can adjust the configuration in theflyte.yamlfile if needed. Alternatively, for manual configuration, you can skip the generation of theflyte.yamlfile by setting therender_helm_valuesvariable tofalsein theyour_environment.tfvarsfile. -
Get Kubernetes access.
Run the following command to get the credentials for the GKE cluster:
gcloud container clusters get-credentials $(terraform output -raw gke_cluster_name) \ --region $(terraform output -raw gke_cluster_location) \ --project $(terraform output -raw project_id) -
Install Flyte to the GKE cluster using Helm.
helm install flyte-backend flyte-binary \
  --repo https://flyteorg.github.io/flyte \
  --namespace default \
  --values flyte.yaml
After Helm finishes deploying the resources, wait for the pods to be in the
Runningstate. Note that in the case of an Autopilot cluster, it may take significant time. You can use this command to track the progress:kubectl get pods -n default -wIn case of any issues, you can check the logs of the pods using
kubectl logs <pod-name> -n default. Then, after changing the values, you can update the Helm release usinghelm upgradecommand with the same arguments as thehelm installcommand.
Access the Flyte Dashboard
At this point, the Flyte dashboard is not exposed to the internet. Let’s access it using Kubernetes port forwarding.
-
List the services and find the service name for the Flyte HTTP service:
$ kubectl get svc NAME TYPE CLUSTER-IP PORT(S) flyte-backend-flyte-binary-grpc ClusterIP 34.118.237.187 8089/TCP flyte-backend-flyte-binary-http ClusterIP 34.118.226.45 8088/TCP flyte-backend-flyte-binary-webhook ClusterIP 34.118.237.19 443/TCP -
Use
kubectl port-forwardcommand to forward the Flyte HTTP service to your local machine:$ kubectl port-forward svc/flyte-backend-flyte-binary-http 8088:8088 Forwarding from 127.0.0.1:8088 -> 8088 Forwarding from [::1]:8088 -> 8088We recommend running this command in a separate terminal window or tab.
-
Open http://localhost:8088/console in your browser to access the Flyte dashboard. You should see the following screen:
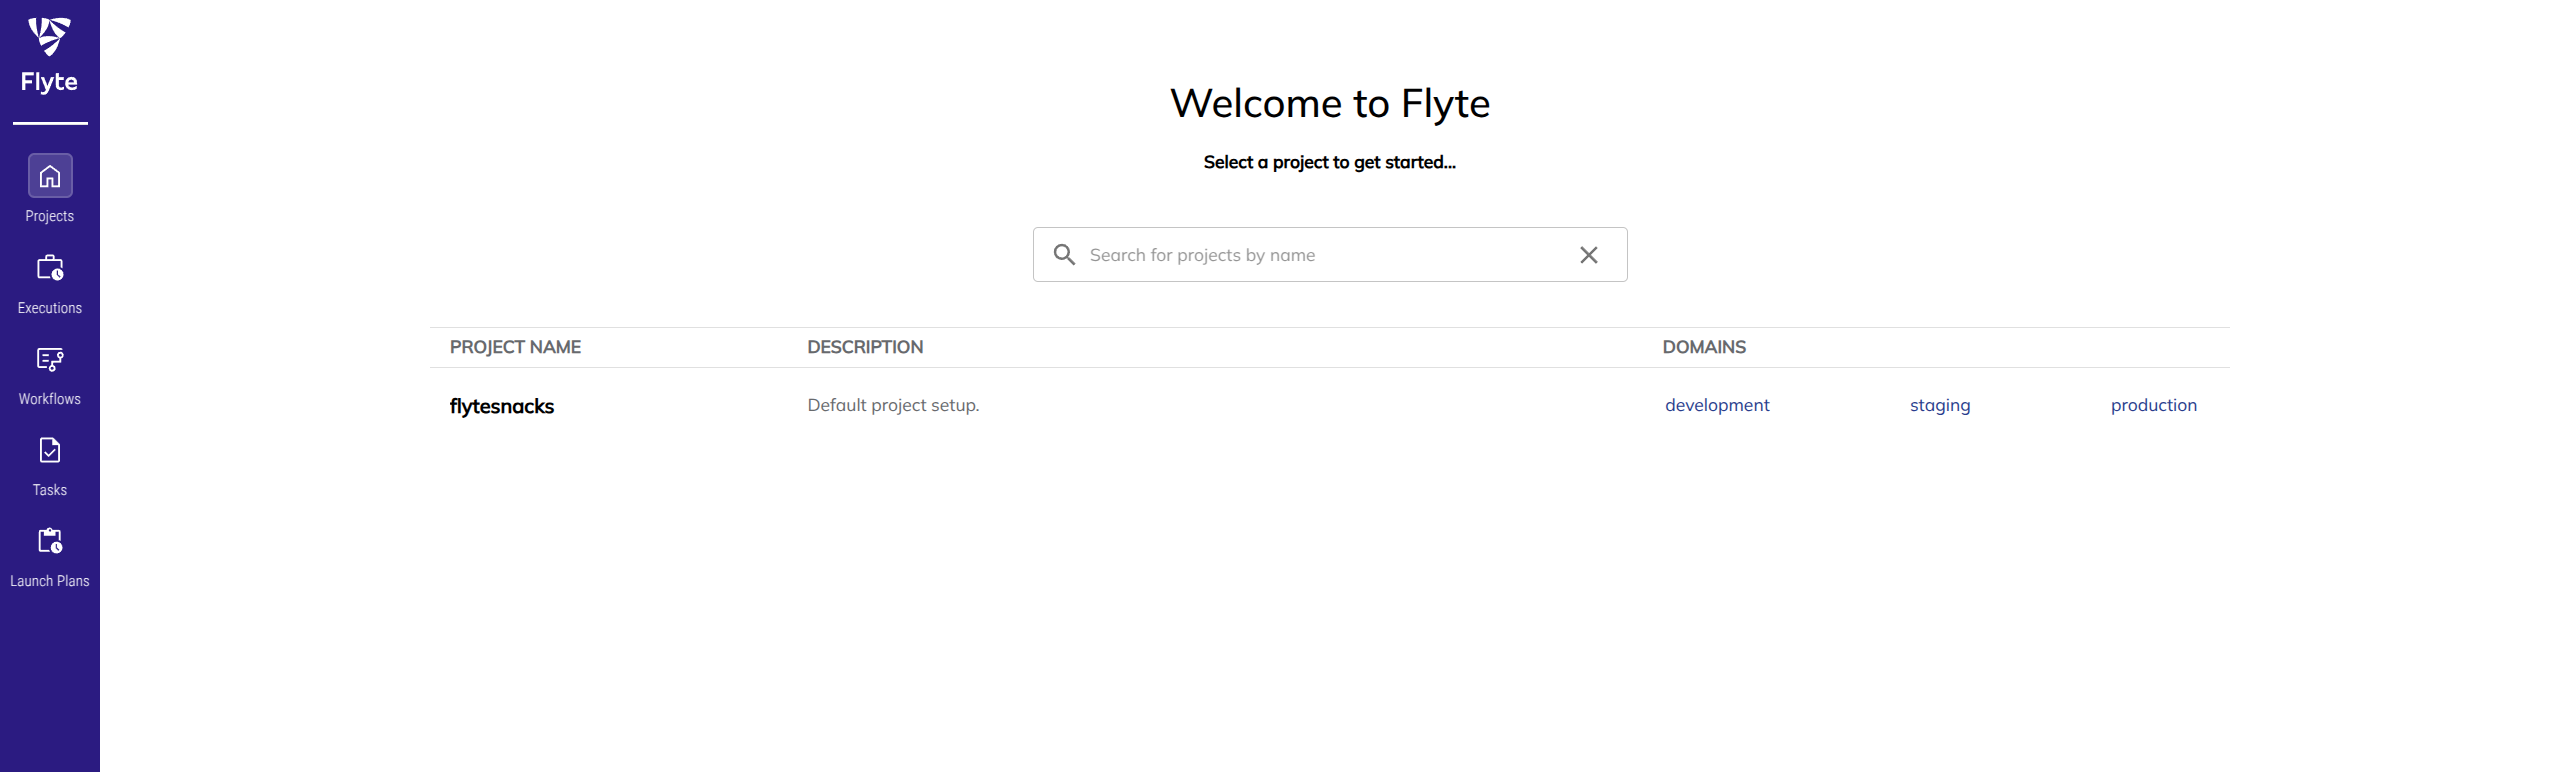
If you experience issues accessing the dashboard, make sure the pods are running and the port forwarding is set up correctly.
Install Flyte CLI and run a sample workflow
-
First, create a virtual environment. The following commands will create a virtual environment in the
venvdirectory and activate it:python3 -m virtualenv venv source venv/bin/activate -
Install Flytekit using pip:
pip install flytekit -
Install flytectl.
Follow the instructions in the Flyte documentation to install the
flytectlCLI. -
Start port forwarding for the Flyte GRPC service:
kubectl port-forward svc/flyte-backend-flyte-binary-grpc 8089:8089We recommend running this command in a separate terminal window or tab.
-
Configure Flyte CLI to use backend running on the GKE cluster through port forwarding:
flytectl config init --insecure --host localhost:8089If you get a connection error, make sure the port forwarding is set up correctly.
If you see the message
Init flytectl config file at ..., the configuration was successful. -
Initialize a new Flyte project using the hello-world template:
pyflyte init --template hello-world hello-world cd hello-world -
Run the sample workflow in the Flyte cluster:
pyflyte run --remote example.py hello_world_wfBy default it runs the workflow in the
flytesnacksproject, in thedevelopmentdomain. You can change the project and domain using the--projectand--domainflags. -
Now Flyte will run the workflow on the GKE cluster. You can check the status of the workflow in the Flyte dashboard (ensure that port forwarding for the HTTP service is still active). You can also check the status using the
flytectlCLI:flytectl get execution -p flytesnacks -d developmentNote the execution ID and wait for the execution to complete. If it fails, check the logs of the pod running the workflow:
kubectl get pods -n flytesnacks-development
kubectl logs -n flytesnacks-development <pod-name>
In the second command above, replace
<pod-name>with the actual name of the pod obtained from the first command. -
To view the details of the workflow execution, including inputs and outputs, run:
flytectl get execution -p flytesnacks -d development --details <execution-id>Replace
<execution-id>with the actual execution ID.
Publish service to the Internet
The following section will guide you through exposing Flyte dashboard and gRPC service to the Internet. As gRPC protocol works over HTTP/2 that in turn requires TLS, we will also need to create a certificate for flyte-backend itself. We will use a self-signed certificate for this purpose. So the steps are:
- Create a static IP address for the Ingress and configure DNS.
- Create a managed certificate for the Ingress.
- Create a self-signed certificate for flyte-backend.
- Update Helm configuration to use the self-signed certificate.
- Create Ingress resource for Flyte.
1. Create a static IP address for the Ingress and configure DNS
Run the following command to create a global static IP address:
gcloud compute addresses create flyte --global --ip-version=IPV4
Get details about the created IP address and note the IP address value:
gcloud compute addresses describe flyte --global
If you have a domain you want to use, go to your domain registrar and create an A record pointing to the IP address you just created. If you don’t have a domain, but you want to test this setup, you can use the sslip.io service. In that case, use the domain <cloud-ip-address>.sslip.io where <cloud-ip-address> is the IP address you just created. The other advantage of using sslip.io is that you don’t have to manage DNS records nor wait for them to propagate.
2. Create a managed certificate
To create a managed certificate, you need to create a ManagedCertificate resource in the cluster. Put the following content in a file named managed-certificate.yaml and replace <your-domain> with the domain you want to use:
# managed-certificate.yaml
---
apiVersion: networking.gke.io/v1
kind: ManagedCertificate
metadata:
  name: flyte
spec:
  domains:
    - <your-domain>
Then, apply the configuration:
kubectl apply -f managed-certificate.yaml
3. Create a self-signed certificate for flyte-backend
Now, let’s create a self-signed certificate for flyte-backend. If you have openssl installed, you can generate a self-signed certificate using the following command:
openssl req -newkey rsa:2048 -nodes -keyout private_key.pem -x509 -days 3650 -out public_certificate.pem -subj /CN=flyte-backend/ -addext "subjectAltName = IP:127.0.0.1,DNS:0.0.0.0:8088,DNS:localhost,DNS:flyte-backend"
Alternatively, you can use any other tool you like to generate the certificate. It’s important to include the subjectAltName (SAN) extension with the DNS:0.0.0.0:8088 value (though it’s not a valid domain name) because the flyte binary uses that address internally and the certificate must be valid for it. All other values are optional and can be adjusted to your needs or left as they are. The CN value is not important and can be anything.
Next, create a Kubernetes secret with the certificate:
kubectl create secret tls flyte-backend-grpc-tls --cert=public_certificate.pem --key=private_key.pem
4. Update Flyte configuration
Now, update the flyte.yaml file to configure Flyte to use the self-signed certificate. First, insert the following configuration to configure the deployment to mount the secret with the self-signed certificate and configure the probes to use HTTPS:
deployment:
  # Mount the secret with the self-signed certificate
  extraVolumes:
    - name: tls-certs
      secret:
        secretName: flyte-backend-grpc-tls
  extraVolumeMounts:
    - name: tls-certs
      mountPath: /etc/flyte/tls
      readOnly: true
  # Configure probe to use HTTPS
  livenessProbe:
    failureThreshold: 3
    httpGet:
      path: /healthcheck
      port: http
      scheme: HTTPS
    initialDelaySeconds: 30
    periodSeconds: 10
    successThreshold: 1
    timeoutSeconds: 1
  readinessProbe:
    failureThreshold: 3
    httpGet:
      path: /healthcheck
      port: http
      scheme: HTTPS
    initialDelaySeconds: 30
    periodSeconds: 10
    successThreshold: 1
    timeoutSeconds: 1
service:
  commonAnnotations:
    cloud.google.com/app-protocols: '{"http":"HTTP2"}'
Then, insert the following configuration to adjust the configuration of the Flyte binary to enable TLS using the self-signed certificate:
configuration:
  # ...
  # Other configuration here
  # ...

  inline:
    # ...
    # Other configuration here
    # ...

    # Fix admin server endpoint configuration
    admin:
      endpoint: localhost:8088
      insecure: false
      caCertFilePath: /etc/flyte/tls/tls.crt
    # Enable TLS
    server:
      security:
        secure: true
        ssl:
          certificateFile: /etc/flyte/tls/tls.crt
          keyFile: /etc/flyte/tls/tls.key
Finally, apply the updated configuration by upgrading the Helm release:
helm upgrade flyte-backend flyte-binary \
  --repo https://flyteorg.github.io/flyte \
  --namespace default \
  --values flyte.yaml
5. Create Ingress resource for Flyte
Finally, create an Ingress resource to expose the Flyte dashboard and gRPC service to the Internet. Put the following content in a file named ingress.yaml and apply the configuration:
# ingress.yaml
---
apiVersion: networking.k8s.io/v1
kind: Ingress
metadata:
  annotations:
    kubernetes.io/ingress.class: gce
    kubernetes.io/ingress.global-static-ip-name: flyte
    networking.gke.io/managed-certificates: flyte
  name: flyte-backend-flyte-binary-http
spec:
  defaultBackend:
    service:
      name: flyte-backend-flyte-binary-http
      port:
        number: 8088
kubectl apply -f ingress.yaml
Wait some time for the certificate to be provisioned and the Load Balancer to be created. You can check the status of the certificate by running:
kubectl get managedcertificate flyte
When the status is Active, you should be able to access the Flyte dashboard via the domain you specified, the link would look like https://<your-domain>/console. If you get an SSL error, wait for a couple of minutes more and try again.
Also, you should be able to use the flytectl CLI without port forwarding and insecure flag. To do that, update the flytectl configuration:
flytectl config init --host https://<your-domain>
Try sheduling a new execution using the pyflyte CLI as we did before and check the status using the flytectl CLI (flytectl get execution -p flytesnacks -d development) or the Flyte dashboard (https://<your-domain>/console).
Enable authentication using Google OAuth
1. Register OAuth 2.0 client
Visit the Credentials page and select “Create OAuth client ID” on the top of the page.
When asked to choose the application type, select “Web application”. In the “Authorized redirect URIs” section, add the following URI: https://<your-domain>/callback (replace <your-domain> with the actual domain you are using).
Note the client ID and client secret values. You will need them in the next step.
2. Generate a random internal secret
To enable authentication you also need to generate a random secret to be used internally by flytepropeller. You can use any password generator you like or run the following command:
openssl rand -base64 32
Also, you need a bcrypt hash of the secret. You can generate it using the following command, replacing <random-secret> with the secret you generated:
pip install bcrypt && python -c 'import bcrypt; import base64; print(base64.b64encode(bcrypt.hashpw("<random-secret>".encode("utf-8"), bcrypt.gensalt(6))))'
3. Update Flyte configuration
Now, update the flyte.yaml file. Add the configuration.auth section, providing the OAuth 2.0 client ID and secret, and the internal secret and its bcrypt hash you just generated. Also, add the domain you are using to the authorizedUris list:
configuration:
  # ...
  # Other configuration here
  # ...

  auth:
    enabled: true
    oidc:
      baseUrl: https://accounts.google.com
      clientId: <oauth-client-id>
      clientSecret: <oauth-client-secret>
    internal:
      clientSecret: <random-secret>
      clientSecretHash: <random-secret-bcrypt-hash>

    authorizedUris: [ https://<your-domain> ]
Finally, apply the updated configuration by upgrading the Helm release:
helm upgrade flyte-backend flyte-binary \
  --repo https://flyteorg.github.io/flyte \
  --namespace default \
  --values flyte.yaml
Now, when you access the Flyte dashboard, you should be prompted to log in using your Google account. After successful authentication, you should be able to access the Flyte dashboard. Note that in the bottom left corner, you should see the button with your initials, which indicates that you are logged in.
Authentication for CLI tools will be handled automatically, so you don’t need to do anything else to enable it.
And that’s it! You have successfully deployed Flyte on GKE, exposed the dashboard and gRPC service to the Internet, and enabled authentication using Google OAuth.
Cleanup
Remove the Flyte Helm installation:
helm delete flyte-backend
Delete the static IP address:
gcloud compute addresses delete flyte --global
Go to the Credentials page and delete the OAuth 2.0 client.
Finally, destroy the provisioned infrastructure:
terraform destroy -var-file=your_environment.tfvars
Feedback
Was this page helpful?
Thank you for your feedback.
Thank you for your feedback.